Insert your Roku device into the HDMI IN port of the Audio and Video Selector Box and connect the HDMI OUT of the Selector Boxes to your projector using an HDMI cable. Also, connect the optical out of Selector Boxes to your AV receiver through an optical cable.
Many Roku users desire to create a home theatre experience by connecting their Roku to a projector and an AV receiver. How to Connect Roku to Projector and Receiver is a frequently asked question.
If you are also one of those Roku users who want to convert your home into a mini cinema theatre, then this article is for you. In it, we will learn about the correct connection between a Roku device AV receiver and a projector. Stay until the end.
Table of Contents
Can the Roku Projector and Receiver work together?
These three devices can be connected; you need an excellent Audio and Video Selector Box. A good Selector Box can establish all your connections in a good manner and also gives you the convenience of shifting video from your projector to your TV
How to Connect Speaker to Projector and Roku
How to Connect Roku to Projector and Receiver – Follow these easy steps
1. Connect the Roku Device to the Audio and Video Selector Box
A good Audio and Video Selector Box can improve your current type of connection, and you can use this AV Access HDMI Matrix Switch to connect a Roku device projector and AV receiver.
This Selector Box has 4 HDMI IN ports that allow you to connect devices other than Roku devices
Also, this has 2 HDMI out ports, with which you can connect your Roku device to the projector and HDTV simultaneously.
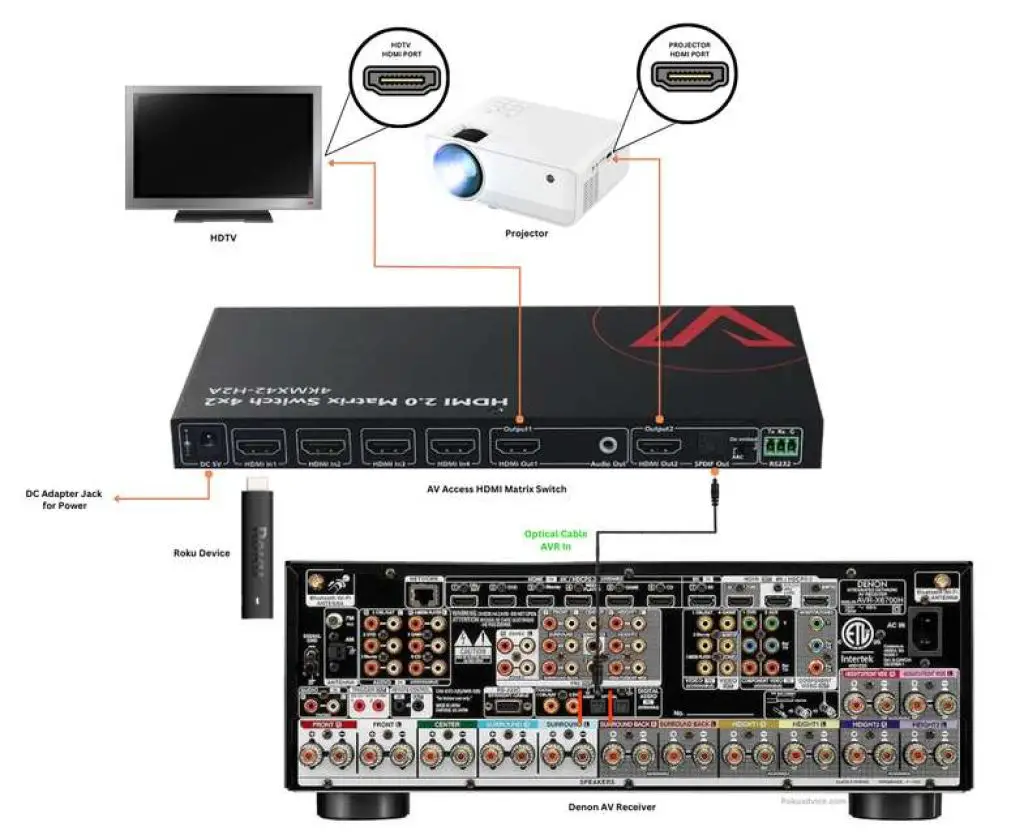
- First, connect your Roku device to one of the HDMI input ports on the Matrix Switch. As an illustration, to understand the connection, we connect the Roku device to the HDMI IN port one on the Selector Box.
- To power the Roku device, connect it via the adapter provided with the Roku.
2. Connect your TV and Projector with an Audio and Video Selector Box
- There are two HDMI out ports in the Selector Box, you have to connect your HDTV TV to its HDMI output one port; for this connection, you can use a good quality long HDMI cable.
- Next, connect your projector to the HDMI out port 2 in the Selector Box.
- The optical out port will be adjacent to HDMI out port 2, located in the Selector Box (Matrix box). You must use this port to establish the connection to your AV receiver.
- Connect one end of the optical cable to the Matrix box’s optical out port and the other end to the AV receiver’s optical in port.
After installing all the connections properly, connect your Selector Box with the power adapter cable provided with it.
3. Configure selector box, Roku device, and projector settings
After connecting all the devices with the help of a selector box, it is time to configure the settings of the devices.
Turn on all the devices, on the front side of your selector box, you will find buttons to set both outputs.
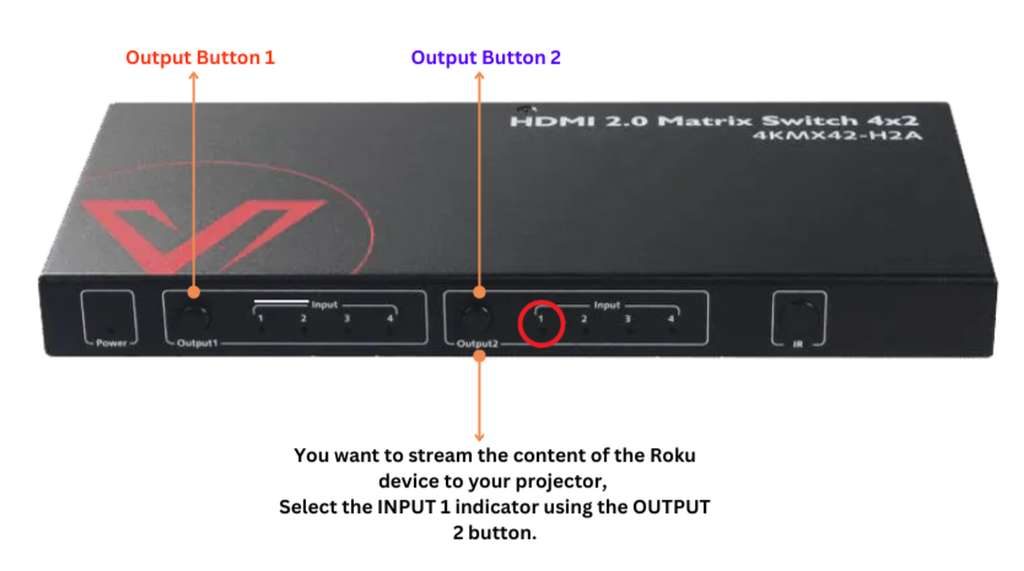
- If you have connected your Roku device to the INPUT IN 1 port of the selector box and you want to stream the content of the Roku device to your projector, select the INPUT 1 indicator using the OUTPUT 2 button.
- Also, using the OUTPUT 1 button, select the INPUT indicator in which no device is connected to the input port or the connected device is turned off.
With this setting, your Roku device will send the signal to the projector with the help of the selector box and turn off the signal sent to the TV.
If you want to shift the signal of your Roku device from projector to TV, reverse this setting. Press the OUTPUT 1 button to shift the input indicator to 1, and press the OUTPUT 2 button to shift it to any other number.
Note:- We connected our Roku device to HDMI input port one on the back of the selector box.
How to Connect Roku to Projector and Receiver Using Audio Extractor Converter
This connection process is for you if you want to connect your Roku device with a projector and receiver using a small intermediary device.
With the help of this Mediator Device (Audio Extractor Converter), you can do it at a lower cost than the connection process mentioned above.
With this Audio Extractor Converter, you can only connect your Roku device to a projector and AV receiver, which provides fewer connection options than the Matrix Splitter.
So it’s up to you which connection process you want to go with
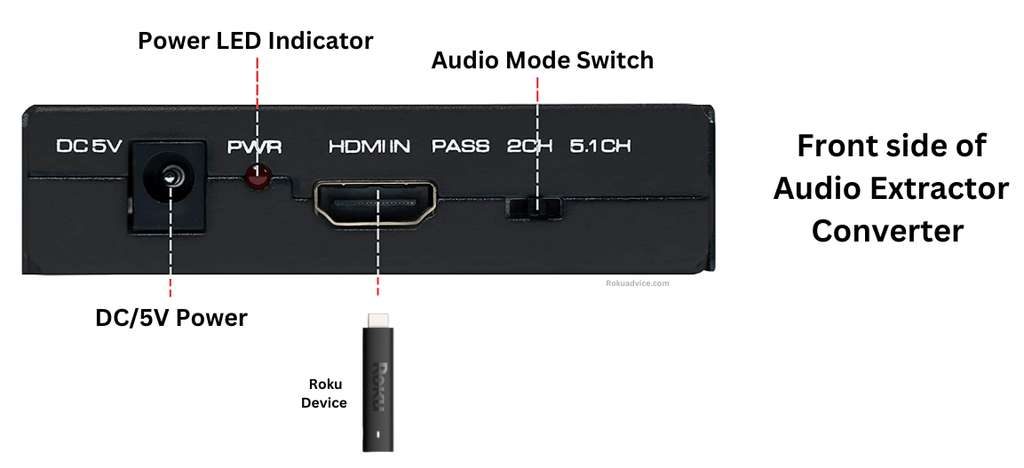
- Audio Extractor Converter works to split audio and video, so we have to connect our Roku device to the HDMI IN port given in front of this Converter.
- Next, To power the Converter and Roku device, connect both devices to the power adapter and set the audio mode switch on the Converter to 5.1 channel.
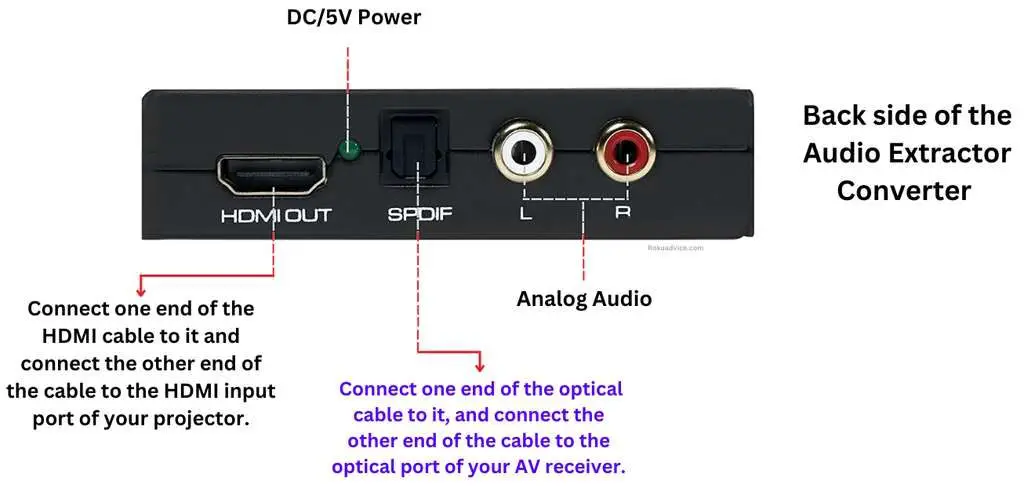
- You will see the HDMI OUT port at the back of the Converter. Connect one end of the HDMI cable to it and the other end to the HDMI input port of your projector.
- Next to the HDMI OUT port of the converter, you will find the optical port, Connect one end of the optical cable to it, and connect the other end of the cable to the optical port of your AV receiver.
Now, it’s time to turn on the devices and set the correct settings for the projector AV receiver. By following the correct settings on all devices, you can enjoy surround sound with large-screen video content viewing.
How to switch Roku stick to Projector and Receiver wirelessly
So far, we have gone through how to connect the Roku projector and receiver in a wired way.
But if you want to connect your devices wirelessly, you can follow this process.
First, we understand the process of connecting devices with the help of a Wireless Pro HDMI Extender Transmitter & Receiver.
With the help of the Wireless Pro HDMI Extender Transmitter and Receiver, you can connect the AV receiver to the projector wirelessly. However, like the selector box connection mentioned above, you will not be able to connect the TV and projector together with this Transmitter and receiver.
Because Roku devices can connect to an AV receiver with the help of a direct HDMI input port, you can connect your AV receiver to a projector wirelessly with the help of this transmitter and receiver device
- First of all, connect your Roku device with the help of the HDMI input port of the AV receiver, and Don’t forget to plug in the power adapter to give your Roku device power
- Next, Connect the transmitter device to the AV receiver HDMI out port and connect the power adapter to power the Transmitter
- Now connect the receiver device to the projector via HDMI cable and connect the power adapter pin to the receiver to give power to the receiver.
- Turn on all devices and set the AV receiver and projector to the correct HDMI settings.
Conclusion
This article taught us how to connect Roku to the projector and receiver.
We looked at three types of connections. Following three connection processes, you can connect your Roku device projector and AV receiver.
Many Roku users want to connect a soundbar instead of an AV receiver, and they have questions about how to connect Roku to a projector and soundbar.
You can connect your soundbar instead of the AV receiver in this connection process.


My name is Bhavic Gadekar. I am a technology enthusiast because I am fascinated by how innovative gadgets and devices are changing our world. I've loved tinkering with electronics and learning how things work. As I grew older, my passion for technology only increased. I enjoy learning new technology-related things and teaching others, so I figured, why not share the solutions through my writing? Besides writing, you'll often find me experimenting with new recipes in the kitchen.